NEW! Axiom 2 Chartplotters Now Available
Explore
02 November 2022
When racing, we all want the best chance of crossing the line first. This means not only a great crew and race-ready boat, but also having instant access to accurate data with displays that are absolutely reliable. This guide will help you to get the most from your Raymarine Wireless Race Master instrument.
When racing, we all want the best chance of crossing the line first. This means not only a great crew and race-ready boat, but also having instant access to accurate data with displays that are absolutely reliable.
Raymarine Wireless Race Master provides all the data required for racing performance without putting wires through the hull or down the mast thanks to its wireless and solar powered operation.
The ultimate tactical race compass and wind shift indicator, the Raymarine Race Master’s two-tier display shows your heading, how far you are above or below the mean course, and how much you are being headed or lifted. Its data will enable you to quickly and easily establish the favoured end of the start line and will help you sail the shortest distance to the windward mark.
Mark Rushall, one of the UK’s best known and most successful sailing coaches, has provided Raymarine with some top racing tips to help sailors get the most from the Raymarine Race Master. Named RYA Coach of the Year and internationally renowned for his sailing success, Mark Rushall’s experience includes coaching racing teams including the 2012 RYA Team GBR Paralympics crews.
Solar power, clear twin “heads up” displays and a stable and accurate fluxgate compass make the Raymarine Race Master a clear favourite for keelboat racers. For many sailors the magnetic bearing display is all they need. But there is more to the Raymarine Race Master. In this guide, we take a look at some of the extra dimensions the lower display can bring to your racing.
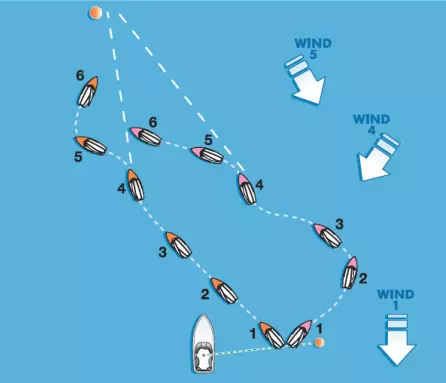
For most races, staying in phase with the windshifts will be at least a part of a winning strategy. In a light, shifty, offshore breeze that strategy may be a simple “tack when the jib backs”. When the wind is regularly oscillating around a mean direction, the Raymarine Race Master really comes into its own. The shortest route up the beat will come from tacking when you are headed below the mean direction (see Figure 1) that way you are sailing higher than a mean direction all the time, on each tack.
To make best use of your Raymarine Race Master in shifty conditions, first make sure that the tacking angle and wind direction are set up for your boat for the prevailing race conditions of the day (see Box 1 on ‘setting up the wind angle and tacking angle automatically’)
For most boats, the tacking angle gets smaller as the wind increases: In time you will get a feel for your boat’s tacking angle in each sailing condition and can set this manually if you prefer.
The wind angle you set using the automatic function is the mean experienced during the set up process: you may wish to adjust this based on your experience before the start or, if there is one displayed, the wind bearing shown on the committee boat.
Box 1
Setting up the wind angle and tacking angle automatically Press the “mode” key (▼), until “WND” is seen in the bottom display. “Wind” mode is now selected.
Checking the stored wind angle and tacking angle
Setting up the wind angle or tacking angle manually
|
Once wind direction and tacking angle have been set up, in “wind” mode the lower display of the Raymarine Race Master indicates whether you are headed or lifted compared with the mean wind angle. For example, “+10” shows that you are lifted 10 degrees, “-15” that you are headed 15 degrees.
There’s also a bar chart giving an instant graphical display on the inside of each display: above the centre line represents a lift, whilst below the line is a header.
Sail upwind on your practise beat and practise tacking whenever the compass shows that you are consistently headed below the mean. The time between tacks gives you an indication of the period of the shifts: how often you might expect to tack if you want to sail the shortest course upwind.
If the shift period is really short (say less than 2 minutes), in some boats and conditions the losses tacking may be greater than the gains from the shifts: look out to see if there are any other bigger strategic influences.
If the period is long, there may not be time for a complete cycle of shifts over the length of the beat: you might decide to treat the shifts as “persistent”: (see below).
Doing the prep with your Raymarine Race Master before the start will help you to answer some of the key points relevant to your tactics on the beat:
The bigger and more regular the shifts, the more important it will be to keep in phase: the strategy is to tack whenever headed below the mean.
Wind bends: make the most of the land features: An obstruction to the wind, for example from a headland or cliff may cause a wind bend. You may also experience a wind bend as an offshore breeze meets the water.
Rather than blowing straight down the course, the wind curves as it passes over the course (see Figure 2). Boats that sail towards the inside of the bend, appearing to take the headed tack first, sail the shortest distance. If the local geography indicates a possibility, use your Raymarine Race Master to verify the existence of any wind bends before the start. A wind bend may affect the whole course or just a part of it.
Sail up both sides of the beat, or relevant parts of the beat, in wind mode. Keep checking the lower display. If you find you are progressively headed on one tack and lifted on the other as you progress up the course, this backs up the possibility of a wind bend. In shifty conditions, you may need to repeat the test several times to be certain. In a wind bend, the strategy is to sail to the inside of the bend.
Persistent shift: make the most of the change: Occasionally a weather front or a trend in the sea breeze causes the wind to continually shift in one direction.
Also, if the period of the oscillating shifts is longer than the time taken to sail the beat, the wind may shift in the same direction for the duration of the beat (though it might shift back on the next one!). The shortest route up the beat is to sail towards the new wind direction taking the heading tack first (see Figure 3).
An insight into the venue and weather conditions may suggest whether long period shifts or a persistent shift are likely. Use the Raymarine Race Master before the start to build confidence in this insight. Check the shift period as in windshifts, above, and test for longer-term persistent shifts in exactly the same way as you test for a wind bend.
Bear in mind that if the wind is consistently and persistently shifting in one direction, the second beat may not be a beat! When the shift continues for the time of the beat, the strategy is to take the heading tack first. If the shift is permanent, use the wind angle function to re set the stored mean wind angle.
When the windward leg is significantly skewed to the wind, you need to be very confident of a major strategic gain to sail the short tack first, (see Figure 4). If the boats are equal at point 4, a shift in either direction will give an advantage to orange.
The Raymarine Race Master makes it very easy to check for course skew. In the starting area, luff until you are pointing directly at the windward mark. Note the windward mark bearing from the top display. Compare this with the mean wind angle. (See “checking the stored wind angle” above). If the wind angle is bigger than the mean wind angle, the course is skewed to the left: starboard tack will be the long tack. If the wind angle is smaller, the course is skewed to the right: port will be the long tack. On a significantly skewed course, the strategy is to sail the long tack first.
One end of the line is nearly always further upwind than the other and this is known as line bias. Your Raymarine Race Master can help you check which end is favoured and by how much.
Select “line” mode by pressing the “▼” key as necessary. Sail down an extension of the line or down the actual line on a transit and line up your mast and forestay with the end of the line. (You can do this on either tack but if the line is busy, starboard tack may be safer!) Once lined up, press the “●” button. “->” or “<-” is displayed, indicating that the port or starboard end of the line is favoured (looking upwind). The number on the display gives the amount of bias relative to the mean wind angle: more than 10 degrees is pretty significant.
After 10 seconds, the display shows the “line perpendicular”. Remember this number: it’s really useful in very shifty conditions. At any time before the start, you can luff to head to wind and compare the instantaneous wind bearing from the top display with the line perpendicular. If the wind bearing is bigger, the line is starboard end biased. If smaller it’s port end biased. The bigger the difference, the more the bias.
On a significantly biased start line start at the upwind end (so long as this does not interfere with your overall strategy!)
Concentrate on sailing the boat; it’s easy to see the whole start sequence by using the Raymarine Race Master’s countdown display. You can correct any time lag at the four or one minute time signal, and toggle between timer and other modes at will.
Box 2
Setting the countdown timer: Press the “mode” key “▼”, until “TMR” is seen in the bottom display. “Timer” mode is now selected. Time in minutes appears on the bottom display. The countdown default is 5 minutes.
Hold down the “●” button for two seconds. The countdown period will flash.
To access and hide timer or elapsed time:
|
Thanks to Mark Rushall for his tactical advice, and for the diagrams from the book Tactics, by Mark Rushall, published by the RYA https://www.rushallsailing.com/
Figure 1
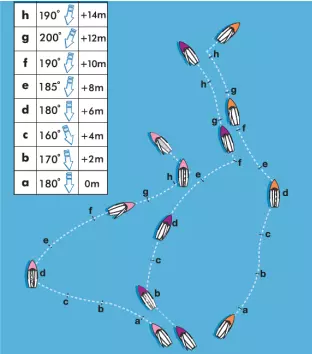
Figure 2
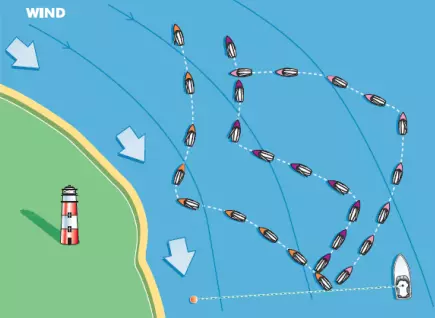
Figure 3
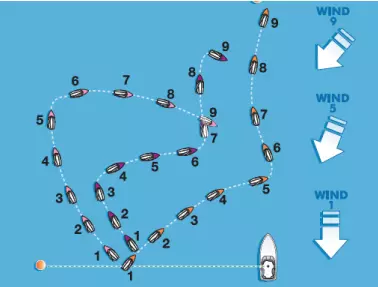
Figure 4